
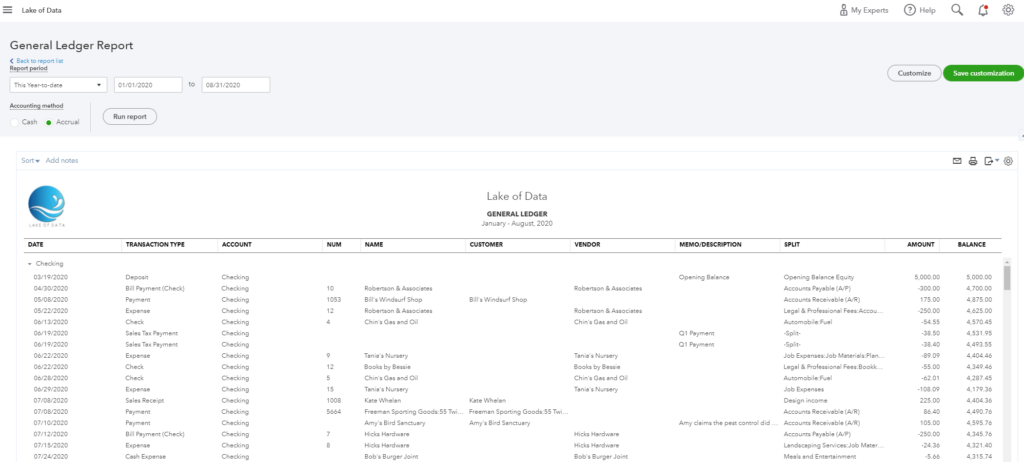
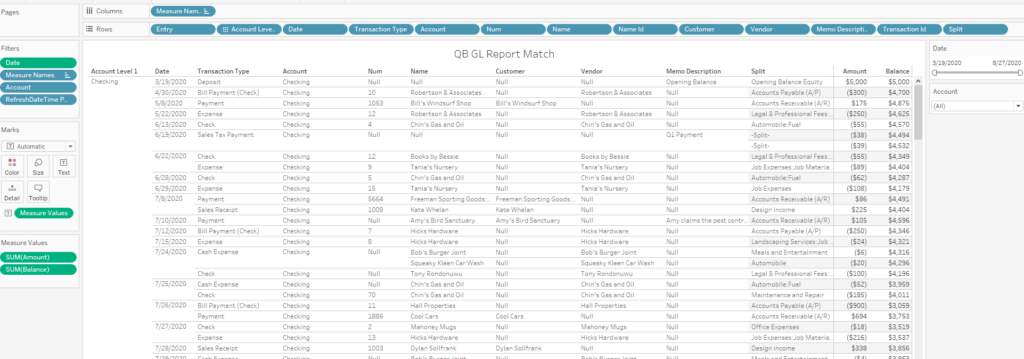
QuickBooks Online delivers a variety of great reports online and the tools it offers to developers are top notch. The reports themselves could use some more visual zazz… Seriously, I need the accounting data available in a data base to serve to a BI tool and take the data set to the next stage, with scenarios such as time series, forecasts or various predictive models. Extracting that data and normalize it is still quite a challenge. I will go through the steps of importing a GL report from a sandbox all the way to Tableau, using QuickBooks API, Alteryx, Snowflake and Tableau. The logic still applies to alternative tools.
From:
To:
Clearing the authentication hurdle
- Go to https://developer.intuit.com/app/developer/homepage to create a free developer account using the SIGN UP button top right.
- If you don’t have an actual instance of QuickBooks to connect to, you can create a sandbox here: https://developer.intuit.com/app/developer/sandbox
- To understand how the API handles the GL report, go to the API explorer here and see how the report data is comprised of 3 levels:
- Headers
- Rows
- Columns
- Note also that there are two distinct Base URLs depending on what you will use:
- Sandbox: https://sandbox-quickbooks.api.intuit.com
- Production: https://quickbooks.api.intuit.com
- Now let’s focus on API access for your data. The full documentation is here, but we can take some shortcuts this way:
- Create a new App at:
https://developer.intuit.com/app/developer/dashboard - Go to the excellent Oauth Playground:
https://developer.intuit.com/app/developer/playground- Select your App
- check Accounting Scope and click Get Auth Code
- Authorize your app
- Click Get tokens at Step 2
- Collect your credentials:
- Realm ID (=Company ID) to uniquely identify the data of your QuickBooks company. The Realm ID is assigned to a company by Intuit when a QuickBooks Online user creates a company. that Realm ID will be included in the URL endpoint.
A nice trick to find it, when anywhere in your QB instance, is to press CTRL+ALT+/ and the Company ID will pop up, ready to be copied… - Client ID from the created App page
- Client Secret from the created App page
- Refresh Token. Note the mention that it expires in 101 days, so if you don’t run your workflow within those 101 days, you will need to return to that Oauth playground to regenerate a Refresh token
- Realm ID (=Company ID) to uniquely identify the data of your QuickBooks company. The Realm ID is assigned to a company by Intuit when a QuickBooks Online user creates a company. that Realm ID will be included in the URL endpoint.
- Use those credentials in the QB connector
- Create a new App at:
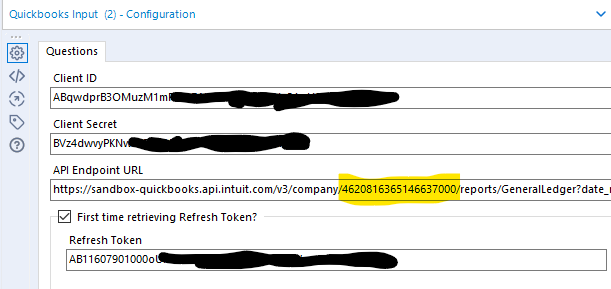
You need to check the first time retrieving option to write the Refresh Token locally to your machine and obtain an access token that will be used to run the query; the refresh token will get replaced and overwritten by a new value, written locally as well. You can uncheck the first time option once you ran successfully the first query.
Putting together the URL for the query
Whichever tool you end up using to extract the raw data out of the QB API, you will need to customize the proper URL to get what you need. Here is the structure:

- Endpoint URL as mentioned earlier, can be either sandbox-quickbooks.api.intuit.com or quickbooks.api.intuit.com for Production
- Realm ID also called Company ID in some parts of the documentation
- Parameters: Described here for the General Ledger report, they let you pick which columns to include, which time frame and most important, which indicators, depending on the multi currency settings of your QB instance. If you don’t see your Amount or Balance in the extract, it is probably because you need to adjust those parameters to pick the other set of indicators. For instance, the amount indicator can be either: subt_nat_amount, subt_nat_home_amount, subt_nat_amount_nt or subt_nat_amount_home_nt depending on your instance, and the QB API will not help you, nor return any error message if you pick the wrong one… Trial & Error is your friend…
Raw API Output
The Alteryx Connector will output what looks like a simple JSON file, with only 2 columns and 7,050 rows in my case:
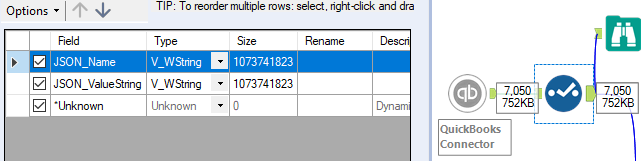
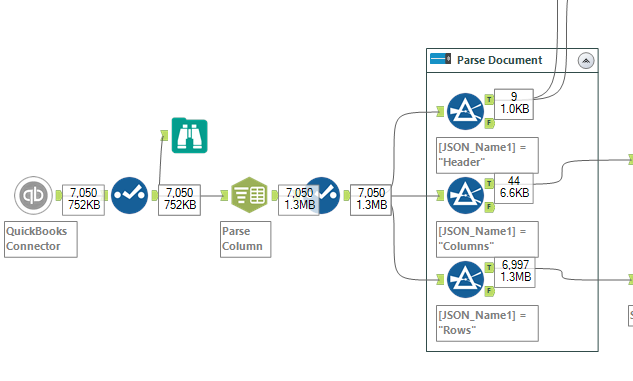
This is very misleading, as this is in fact a VERY nested JSON data structure, comprising several tables as illustrated here in the number of segments between dots separating them:
We will recourse to the Text to Column tool to convert the content of the JSON into several tables to break that structure and ultimately join them into a single flat table:

Flattening Strategy
Using filters, I will break down the data source into multiple tables, each reflecting a different level, starting with Report Headers, then Column Headers and then Rows:
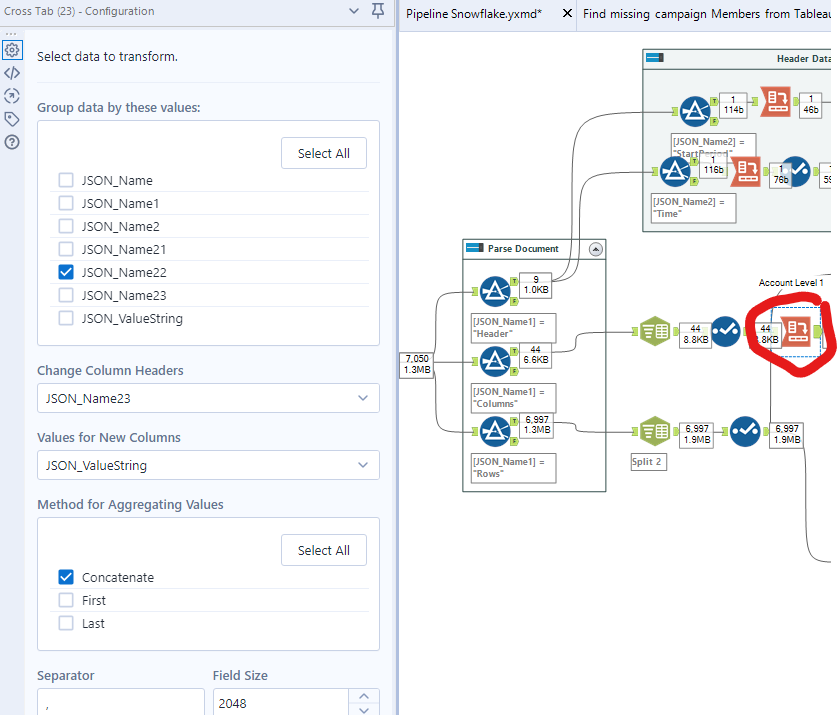
The next steps is to obtain a single row per record with multiple columns, which can be done using simply a Cross Tab tool:
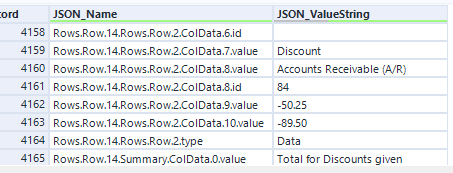
However, looking further at the output of the Rows, the 6,997 records in this case, you will realize it contains more levels of columns. This will require further parsing of the headers from the row, filtering and rebuild of rows with columns, by following this logic:
In my QB sandbox, the Chart of Accounts comprises of 3 levels of accounts. I will therefore parse the rows up to 3 times before getting to the transactions with $ indicators. There could be more levels in other instances. The parsing will have to be adjusted according to the structure of the Chart of Accounts being extracted. Building that parsing logic can be quite tedious, but the logic can be repeated with some Copy+Paste and should be tested right away. I highly recommend the use of the Alteryx workflow cache feature to avoid hitting the QB API too much.
Note that some tools like Precog can ease the challenge of flattening those JSON arrays, even within Alteryx with a dedicated macro. Here is a great explanation of the flattening process: https://precog.com/introduction-to-json-and-nosql-data/.
Hi Frederic,
Original DropBox link for the QuickBooks Input Tool is no longer working. Do you have a copy of this tool that you can share?
Please confirm.
Thanks!
This was not my link nor my file, but I updated the link so that you can get the file…
Have you looked at FinJinni? It extracts all the data from QuickBooks and puts into an open SQL database. It comes with an Excel add-in but works with other BI tools such as PowerBI and Crystal Reports.